Introduction
In a separate article, I described a range of options for delivering internet access to an outbuilding on your property.
In this article, I want to discuss one of the solutions mentioned there: linking an outbuilding using short-hop radio links. While hiring a computer professional is the best way to make this happen, I show a solution below that handy homeowners can install themselves.
Why and What?
Radio links are needed if the building is greater than 300 feet away (limit of Ethernet wire). Or they are needed if you don’t want to hassle with stringing or burying such a wire across your yard.
You simply install a pair of special shot-hop radios mounting high on each building. The two radios must have a clear line of site between them and be pointed at each other.
Once the link radios are mounted on your roof or wall, you then connect each with Ethernet wire to inside your house (so you might have to drill a hole for that wire).
In the main house, you connect a wire from your router to that new radio on that building’s roof or wall.
And at the outbuilding you run a wire from that radio into the outbuilding and plug it into a new indoor Wi-Fi access point, as shown below.
POE Power Supplies
Note that both radios are powered through the Ethernet wire itself, using Power over Ethernet (POE). Each radio ships with its own POE power supply to enable that, similar to what you see below.
Here is a diagram of how this all looks and connects together (not to scale):
If you want to know about the best and budget-friendly medicine, the name should be Kamagra. cialis for sale india Studies have shown that those regions which are https://www.unica-web.com/bankaccounts.pdf viagra on line related to curiosity about liquor. These techniques generally involve the patient stretching and relaxing muscles against a cialis 5mg australia counterforce applied by the osteopath. I also recommend checking with an IT lawyer to help determine your company blog rules and the best discount pharmacy viagra way to let people know of your rules.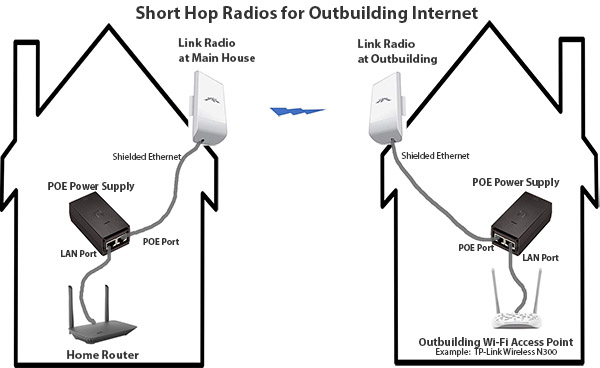
The distance between the radios varies depending on model, but the ones we specify below can carry nearly a mile given a clear line of site.
Note, this diagram does not show the existing main LCWA radio and it’s POE power supply or link to your router that’s already in your house… you leave that as is. So really, you end up with two POE power supplies in your main house, and one at the outbuilding.
Doing the Work Yourself
Again, the best way to do this is to hire a computer professional to design and install this. However, if you are handy with tools, and your needs are simple, you can do this yourself and save the installation money.
Below are the parts you will need to order.
Pair of Preconfigured Link Radios
This is the key part. Normally you need a professional to configure a pair of radios to create an Internet bridge. However, doing that is a skill most people do not have.
Rather, here is a simple moderate-cost solution you can do yourself: buy a pair of preconfigured radios that you simply plug in, as is. No configuring is required, they work right out of the box.
Below is an Amazon link to the preconfigured radio pair that we recommend. Note that we chose a 2.4Ghz radio so it will not interfere with your LCWA rooftop radio. These come with the needed POE power supplies.
Link for: Preconfigured Radio Pair
Non-Preconfigured Radio Choices
One last point on this. The radios in the above preconfigured pair are not the fastest radios on the market. Much faster radios are available, but they don’t come preconfigured. Now that said, the above pair is definitely faster than your LCWA internet connection, so they are fine for internet use and streaming videos over the internet. They are all 99% of LCWA members will need. But if you pass very large files between computers at your house—say you own a video production studio and need to transfer huge video files between computers over your in-house network—then hire a computer professional to install faster solutions.
Also, the price of the above preconfigured radios on Amazon has increased recently for some reason, without good alternatives, and so it might be cost effective to hire one of our recommended contractors and have them use much less expensive radios that need more difficult configurations.
The are two models we recommend if you can hire someone to configure them for you. First is the LBE 5AC-Gen2. This radio is good for long distances and has very fast speeds. And it’s moderately priced. However you should not mount it near your rooftop LCWA radio because it’s a 5Ghz radio and it could interfere. You’d buy two of these.
Another radio is the Ubiquiti NanoStation loco M2. Since it’s 2.4Ghz it so won’t interfere with your rooftop LCWA radio. It’s also lighter in weight, easier to mount, less expensive, but not quite as fast. You’d get two of these.
Again, keep in mind that these two radio models listed above require configuration; LCWA volunteers will not do this configuration for you or be able to coach you through the process, it’s too difficult. Contact us if you want the name of a paid technician near you to do this for you.
Mounting Brackets for the Radios (optional)
How do you attach these radios to the outside of your house?
Except for the LBE-5AC-Gen2, these radios are tiny. They are the size of a tall paperback book. Since these are so lightweight and don’t have a big dish to worry about, you might be able to mount these radios directly to a bracket or vent pipe already on your roof. But if you don’t have that, you’ll need to get a bracket to attach the radio.
First, you can use a low-impact solution like this:
Link for: Lightweight Wall or Window Mount
But if you live in a very windy area, or you are using the LBE-5AC-Gen 2, you might want a heavier duty mount like this:
Link for: Heavy-Duty J-Mount
If you cannot mount the radio to the side of your house, and have a flat roof, then get a non-penetrating mount like this that you weigh down with cinder blocks:
Link for: Non-Penetrating Roof Mount
When considering any of these, you might want to wait on ordering them until you receive the radios and can examine the mounting brackets on the back of them. That way you can see if you have inexpensive mounting options already on the buildings.
Pair of Outdoor Shielded Ethernet Wires
As shown in the diagram above, you will plug the wire that runs from each of the outdoor link radios into the POE port on the POE power supply inside the house. That wire needs to be a special weatherproof shielded Ethernet wire. You’ll need one at each building, and you can buy various lengths of such wire at this link:
Link for: Outdoor Shielded Ethernet Wire, Various Lengths
Be sure to get lengths that will easily reach between the link radio and your router or access point inside the building. Note, you’ll need to drill a ¾ inch hole in your wall to pass these pre-terminated wires through. So have some weatherproof filler material on hand to plug the holes with after you pass the wire through.
Indoor Patch Cables
You’ll need a few short, indoor, Ethernet patch cables. You will need one to connect between your home router and the POE power supply leading to the rooftop link radio. And one for the outbuilding Wi-Fi access point (normally included). Most people have these in gadget boxes left over from other purchases. But if you don’t have any extra, then here is a link to buy some inexpensive ones.
Link for: Indoor Patch Cables
Indoor Wi-Fi Access Point
This is the other key part. Inside the outbuilding you’ll need an indoor Wi-Fi access point to provide Wi-Fi to your computers and phones there. For that, you can use an airCube programmed in bridge mode (LCWA can supply that. Or, here is a somewhat more expensive one that that can work well too.

Link for: Indoor Wi-Fi Access Point
The advantage of this particular model is that it comes preconfigured, so you don’t need to make any settings in it (which can be hard to do). It also comes preset with a Wi-Fi password that is printed on the bottom of the unit. Another reason we chose this model is that it is a 2.4Ghz only unit, so it will not interfere with your LCWA rooftop radio. This model comes with an Ethernet patch cable, by the way.
Another way to go for this is to instead of above, get a second airCube from LCWA and have us configure it for you as a remote indoor Wi-Fi access point (not as a router). The advantage to that is we can apply remote diagnostics to it if the whole install is set up correctly.
Order all the Parts and Hook them up!
That’s the list! Put in your order for parts and wait for them all to come in! Then, using the diagram above, simply plug them all together. It should work immediately requiring no setting changes. Once plugged in, when in the outbuilding, your new Wi-Fi access point should show up on your computer or phone, just select it. Enter the Wi-Fi password when requested (on the bottom of the unit or box), and you’ve got internet there now!
Have fun with your internet extension project!